Before a payment can be taken from the customer, a mandate needs to be created.
In the ribbon, you have the following options:
Send PayLink
This action sends the PayLink email to the customer, so they can sign the Direct Debit Agreement.
Resend PayLink
This action resends the PayLink email to the customer, so they can sign the Direct Debit Agreement.
Cancel PayLink
This action cancels the PayLink, that has been created or created and sent to the customer, so they cannot use it to sign the Direct Debit Agreement anymore.
Cancel Mandate
This action will cancel the GoCardless Mandate, so the existing Direct Debit Agreement gets cancelled.
Update Mandate
This action updates the GoCardless Mandate manually, with any information that is available on the GoCardless portal, but different in Business Central.
Change Mandate Email
On mandate creation, the Pay Link or Billing Request Link will be emailed to the person with authority to create a Direct Debit. Typically though, this person may not want to receive emails from GoCardless about each payment, and will instead ask for the emails from GoCardless to be sent to something like remittances@contoso.com. Use the “Change Mandate Email” action to enter a new email address that is sent to GoCardless.
General
Mandate No.
The Mandate No. is the identifier in Business Central for the mandate and is restricted to 20 characters in length. Depending on your No. Series setup, you will have to enter the Mandate No. manually or if it has been setup as default No., it will automatically populate the Mandate No. when tabbing out of that field.
Customer No.
The Customer No. is the identifier in Business Central for the customer. In here, you will select the customer you are creating the mandate for.
Customer Name
Once you have selected the Customer No., the Customer Name will be populated here automatically.
Mandate Description
You can either enter a new Mandate Description or select a Mandate Description that you have used previously. If you enter a new Mandate Description, it will be automatically added to the list of Mandate Descriptions and it will be available for you to select for a new mandate. This description will also show up on the GoCardless webpage when the customer clicks on the hyperlink in the email they will receive; that way the customer will know what they are paying for.
The email address for the customer will appear automatically if there is an email address on the customer card. Otherwise, you will enter or change the email address of the customer here.
Language
You will need to select the language to send out the communication in. You can select from a big list of languages from Bulgarian to Turkish.
GoCardless Currency
The currency will automatically display once you have chosen the scheme.
Customer Default
You can select here, if you want to use this mandate as default for transactions, if there are multiple active mandates for this customer.
PayLink
Setup Status
In here, you will see the various setup status' of the PayLink:
- “Entry Created” The initial status when the entry is created.
- “PayLink Created” Once the PayLink URL has been created.
- “Email Sent” Once you have sent the PayLink URL via email to the customer.
- “Cust. Signed” When the customer has clicked on the PayLink URL and has completed the Direct Debit Agreement, signed and submitted it.
Billing Request No.
If the mandate was created from a Billing Request Link (as opposed to the older Pay Link method) the Billing Request No. will be shown here.
Last Email Sent Date Time
This will show the time and date stamp of the last email sent to the customer with the PayLink.
PayLink URL
This field will display the PayLink URL that was sent to the customer.
GoCardless
Creditor
Select the creditor that you would have setup initially as part of your setup.
Scheme
Select the scheme, depending on the currency and country you want to take payments from. If the scheme you have chosen does not correspond with the currency on the customer card, you will get a warning message.
Customer
The GoCardless Customer ID will be displayed.
Customer Bank Account
The GoCardless Customer Bank Account ID will be displayed.
Mandate
The GoCardless Mandate ID will be displayed.
Reference
The GoCardless unique Reference will be displayed. Depending on the scheme, they will have different length and character set requirements. GoCardless will generate a unique reference satisfying the different scheme requirements.
Mandate Status
This will display the various Mandate Status':
- “Pending Cust. Approval” Initially, it will be “Pending Cust. Approval” - this means that the mandate has not yet been signed by the customer.
- “Pending Submission” Means the mandate has not yet been submitted to the customer’s bank.
- “Submitted” Is once the mandate has been submitted to the customer’s bank but has not been processed yet.
- "Active” This will show once the mandate has been successfully set up by the customer’s bank.
- “Failed” When the mandate could not be created.
- “Cancelled” When the mandate has been cancelled.
- “Expired” When the mandate has expired due to dormancy.
Date of Creation
This will display the date the mandate was created in GoCardless.
Next Possible Charge Date
This will display the earliest possible date that can be used as a Charge Date, i.e. when the first payment can be taken on any newly created payment for this mandate. The dates in here will change over time.
Payments Require Approval
This toggle shows, whether payments and subscriptions under this mandate require approval via an automated email before being processed.
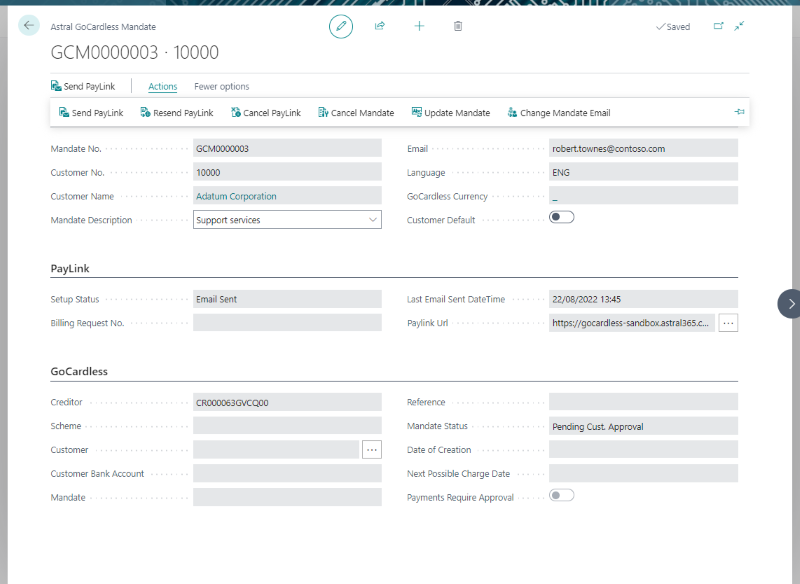
This is how the Mandate Card should look like, once it has been set up:

Figure 1 | Mandate Card Setup Complete