Astral Pay - Help:
Watch the Video
When cards have been flagged with ‘Save Card’ (either by the customer using a PayLink/savelink or via the Business Central user when processing a MOTO payment) it is possible to use the card to take payments in the future. A saved card is similar in concept to a Direct Debit Mandate.
To create a Payment Batch, from the Role Centre, select ‘Payments’.

Figure 1 | Role Center - Payments
Then, on the ‘Payment’ page, select the ‘Create Payment Batch’ action.
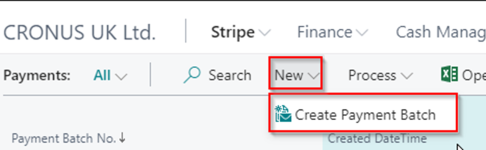
Figure 2 | Payment Page
A Payment Batch will always be for a single currency. If you collect Card Payments in multiple currencies, you will need to create multiple Payment Batches. Populate the ‘Astral Pay Create Payment’ page as follows.
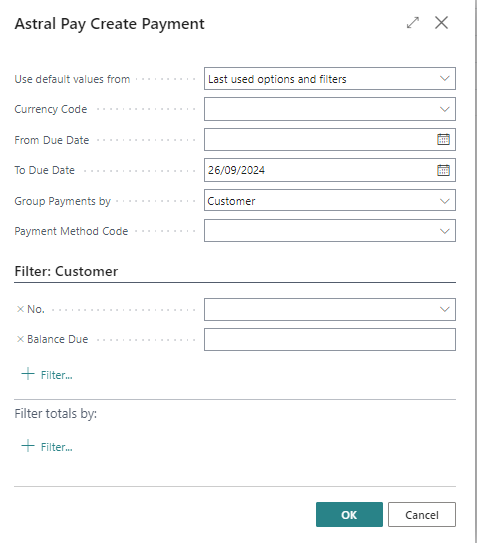
Figure 3 | Astral Pay Create Payment Page
Currency Code:
Leave this empty for Local Currency, or specify the Currency Code that you want the Payment Batch to be in.
From Due Date:
This will filter the list of Invoices to be included in the Payment Batch by Due Date, but will exclude any Invoices that are open but fall due before the ‘From Due Date’ specified. Therefore it is advisable to leave this field blank.
To Due Date:
Enter the Invoice Due Dates that you want to collect up to. For example, if you only want to collect payment for invoices that fall due prior to 31st May 2021, then enter 31/05/2021.
Group Payments by:
This can be ‘None’ for no grouping, or ‘Customer’ to collect a single payment for multiple invoices from the same customer. We would advise selecting ‘Customer’ as it will reduce the value of Fixed Fees that are paid to Stripe.
Once the fields are populated, click OK to create the Payment Batch and populate it with Payment Entries.
The routine will loop through each customer (within the Customer No. filter if specified) that has open invoices that aren’t already included on a previous Payment Batch. It will then query to see if the Customer has a ‘Stripe Customer Mapping’, and if it does, it will further query to see if there are any ‘Stripe Customer Payment Methods’ that are flagged as ‘Saved for Future Use’. Finally, it will check that the card expiry date is still valid before entering the Customer and Payment amount in to the Payment Batch.
If invoices were found that could be collected, a Payment Batch is created, and opening the Payment Batch will show the Payment Entries.

Figure 4 | Astral Pay Payment Entries
If the payment was grouped by customer, and multiple invoices were found, the ‘Applies-to Entries’ field will show a value greater than 1, and clicking the number will show the ‘Payment Entry Application’ entries being collected by the payment.
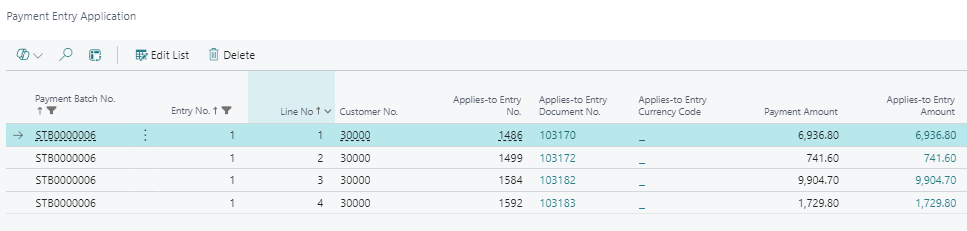
Figure 5 | Payment Entry Application
At this stage, it is possible to change the value being collected, as the payment is yet to be sent to Stripe.

Figure 6 | Payment Entry Application - Edit List
Once the ‘Payment Entry Application’ page is closed, the value of the Payment will be changed.

Figure 7 | Updated Payment Entry
As the Payment has not been sent to Stripe, it is also possible to delete ‘Payment Entry Allocation’ lines, and to delete the Payment Entry for that customer entirely.
Once you are happy with the contents of the Payment Batch, click ‘Send To Stripe’, to process each payment.

Figure 8 | Send To Stripe