Astral GoCardless - Help:
Watch the Video
As you add more and more mandates, you will be saving time by running a weekly or monthly payment collection process for multiple customers. You will therefore be creating a Batch of payments as opposed to processing individual payments. To create a 'Payment Batch' click on 'Payments'.

Figure 1 | Payments
The Payment screen will open.
Click on ‘New’ then ‘Create Payment Batch’.

Figure 2 | Payment Screen
The routine will pick up posted invoices within the parameters you set.
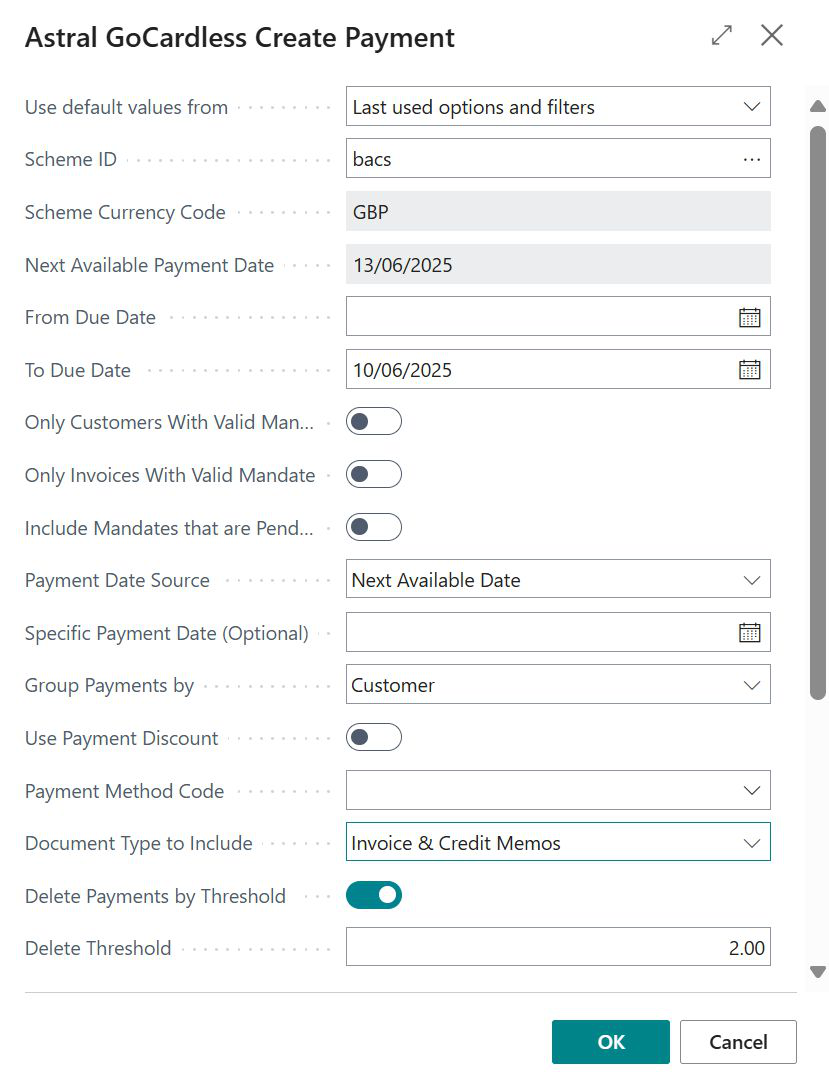
Figure 3 | Create Payment Batch Screen
Available Parameters
| Name | Description |
|---|---|
| Scheme ID | The Scheme for the payment batch. All payment entries within the batch must be for one scheme. |
| Scheme Currency Code | Defaults based on the Scheme selected. |
| Next Available Payment Date | Defaults based on the Minimum Advance Notice Days and Bank Holiday Calendar Code for the selected Scheme. |
| From Due Date | The earliest payment Due Date on the sales invoices to be settled. Recommendation: leave this field empty. |
| To Due Date | The latest payment Due Date on the sales invoices to be settled. |
| Only Customers with Valid Mandate | When selected, only customers with a signed GoCardless mandate will be included. |
| Only Invoices with a Valid Mandate | When selected, only invoices with a “GoCardless Mandate No” specified in the Invoice Details Fast Tab will be included. |
| Include Mandates that are Pending Customer Approval |
When selected, invoices for customers with mandates that are “Pending Customer Approval” will be included. Recommendation: do not enable this unless you are certain the mandate will be approved. Some mandates remain pending for manual processes (e.g., dual signatures), and GoCardless allows a payment to be created even if customer approval is still required. |
| Payment Date Source |
Specifies how the Payment Date is set for each payment entry:
|
| Specific Payment Date (optional) | A date must be entered if “Specific Date” is selected for “Payment Date Source”, or if “Group Payments by Customer” is selected. |
| Group Payments by |
Specifies how customer invoices are grouped into payments:
|
| Use Payment Discount | Include invoices for which the customer can receive a payment discount. |
| Payment Method Code | Only invoices with the specified Payment Method Code will be included in the payment batch. |
| Document Type to Include | Sets the filter used on Customer Ledger Entries for Document Types to be included. Note: if “Group Payments by” is set to None, this can only be set to Invoice or All Positive. |
| Delete Payments by Threshold | When selected, any payment entries equal to or below the specified threshold will be deleted. Useful to prevent credit entries (which cannot be sent to GoCardless) or very small collections that aren’t efficient due to charges. |
| Delete Threshold | Any payment entry equal to or below this amount will be deleted if “Delete Payments by Threshold” is enabled. |
Payment entries that fit your parameters will then be created.

Figure 4 | Payment Entries
Any errors at this point will be notes against the payment entries.
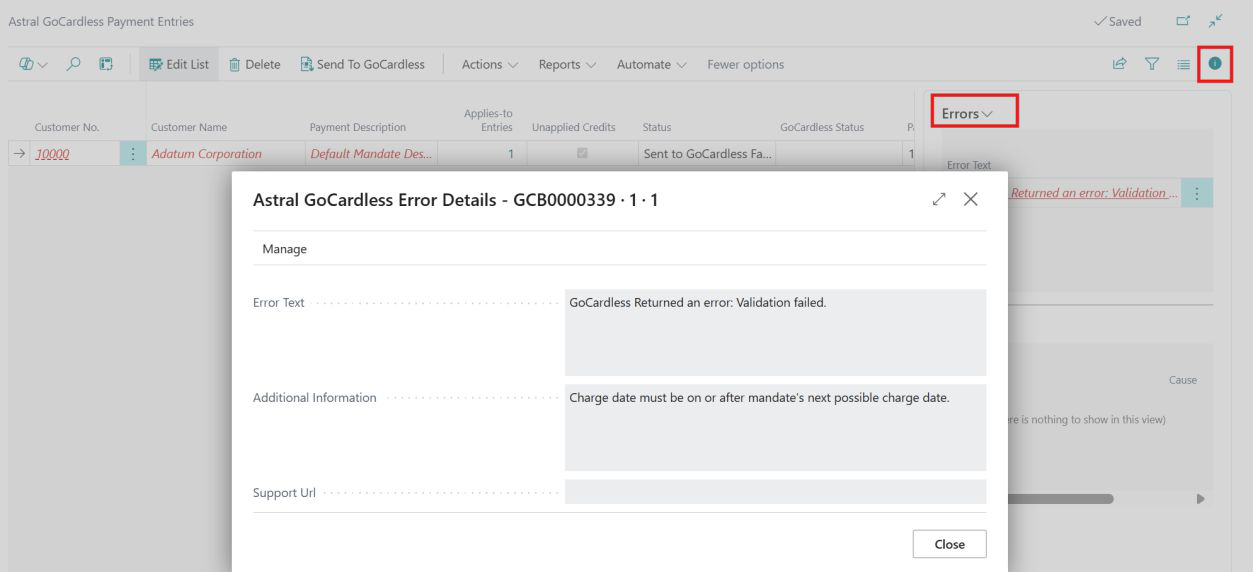
Figure 5 | Payment Entries Errors
Select your payment and then click on ‘Process’ then ‘Send to GoCardless’.
However you can also do this from the Payment Entries screen and there are more options such as Retry and Resend, so see the next section for more details on Submitting Payments.

Figure 6 | Send To GoCardless
The tiles on your Role Centre will show the Status of your current payments.

Figure 7 | Status Of Current Payments
Failed Payments will appear in the Failed tile once the Notification from GoCardless has been processed. A failed payment is one with a status of Failed, Customer Approval Denied or Charged Back.
Payments that have been successfully collected will appear in the payout you receive from GoCardless for the scheme. These can be viewed via the Payouts tile.